The Game Manager’s Manual
Everything you need to plan a route, brief two teammates who can’t see the same map, and bring a race home — from an empty checkpoint set to the final leaderboard.
How a Race Fits Together
Every GeoRacer race has the same three people in it, even when it’s just you testing solo: a manager running the dashboard from a laptop, a runner out in the field with a phone, and a home base teammate parked in front of a browser. The runner and home base see different things on purpose — the whole game is built around them having to talk to each other.
Fig. 1 — Who sees what
A game is built from two reusable ingredients you set up first — a checkpoint set (the physical route and its questions) and, optionally, a question set (extra trivia solved between checkpoints). You then wrap those in game-level rules — how routes are handed out, when the clock starts, whether being late costs points — and hand out one 6-character code that both teammates use to join.
The rest of this manual walks through that build order: checkpoint sets and question sets first (§2–3, since a game can’t exist without at least a checkpoint set), then the game wizard itself (§4–7), then what you do with teams once they’ve joined (§8), what the dashboard shows you mid-race (§9), how the numbers on the leaderboard are actually computed (§10), how a race ends (§11), and how to turn a finished race into a conversation worth having (§12).
Checkpoint Sets
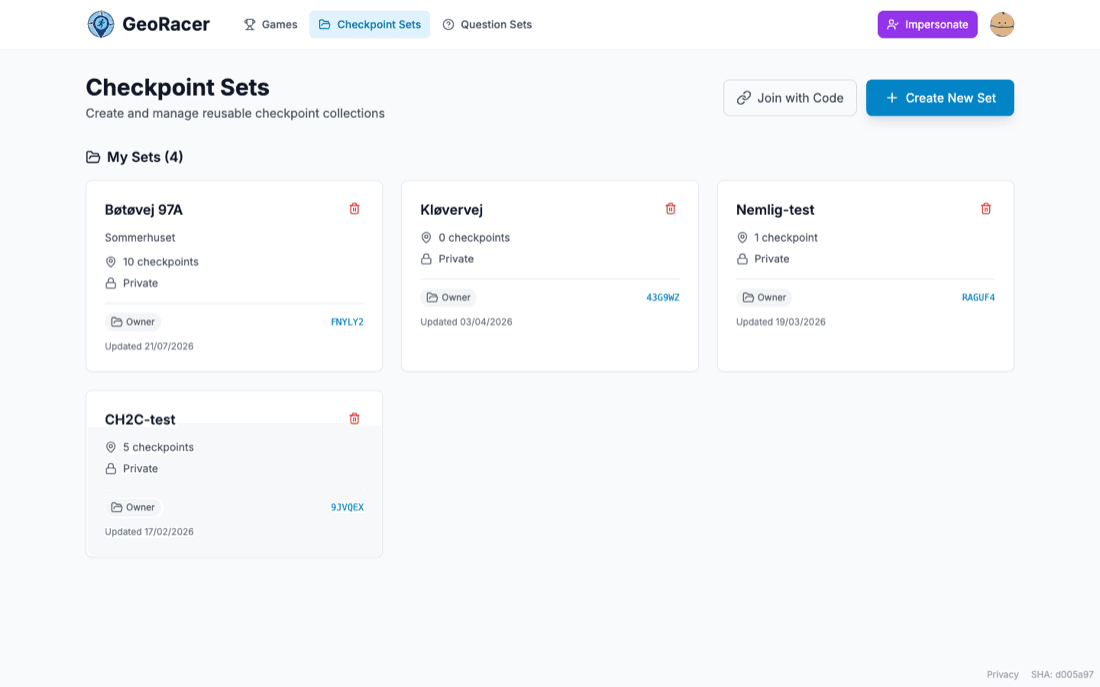
A checkpoint set is the physical shape of a race: a home base location plus a list of geofenced points, independent of any particular game. Build one once — a park, a summer-house neighbourhood, a stag-do route — and reuse it across as many games as you like. Manage them under Checkpoint Sets in the top nav. When you create a set, the home base map has an address search, so you can start from a street name instead of hunting for the spot by hand.
Placing checkpoints on the map
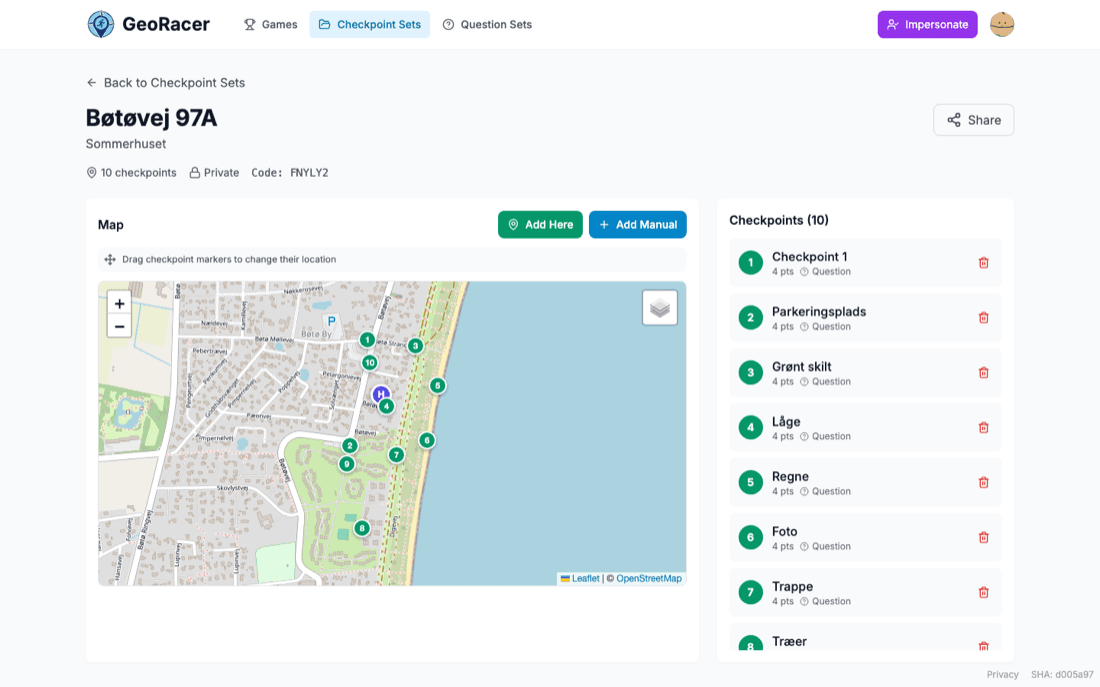
Open a set to get a map with your existing checkpoints as numbered pins, and your own position marked if you’re standing in the area. Add Here drops a pin at your current device location; Add Manual lets you type coordinates. Drag any pin to move it, or type new coordinates in the checkpoint dialog — the marker follows what you type, and a comma decimal separator is read the same as a full stop. Each checkpoint gets a name, a point value, and a capture radius in meters (how close a runner’s GPS has to get before the checkpoint counts as reachable).
Checkpoint answer types
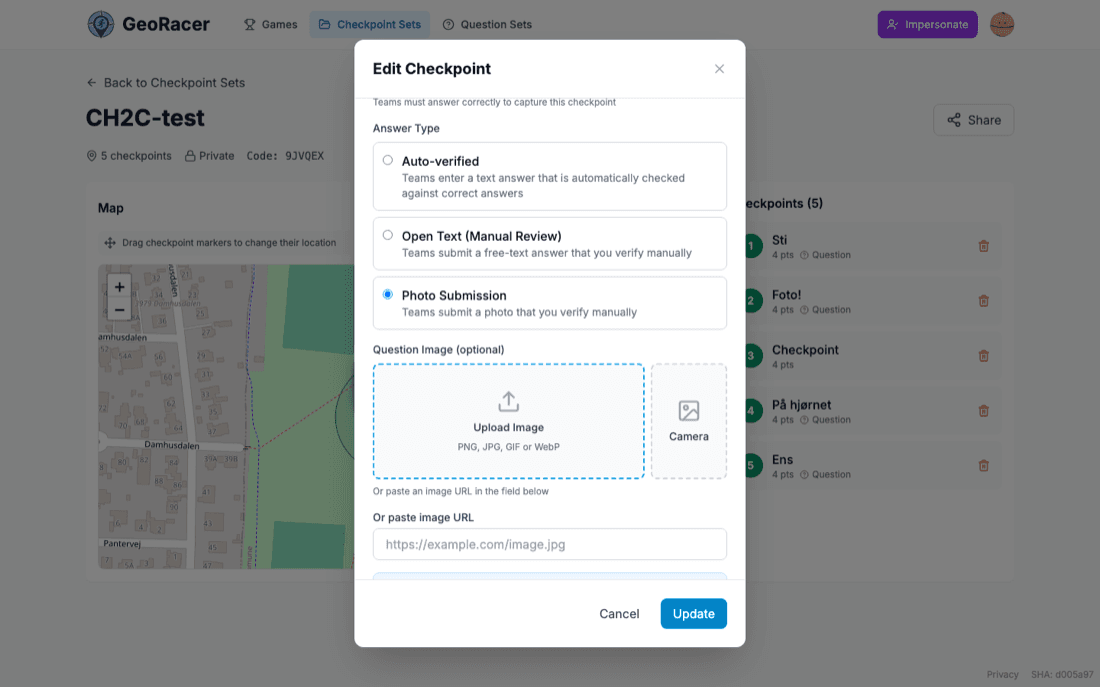
A checkpoint’s “question” is optional — leave it blank for a pure GPS tag-and-go. Fill it in and you pick one of three answer types, which decide how a runner’s answer gets scored:
| Answer type | How it’s scored |
|---|---|
| Auto-verified | Runner types an answer; it’s checked instantly against the correct answer(s) you entered, case-insensitive. No manager action needed. |
| Open Text | Runner submits free text; it lands as “Pending Verification” until you read it and award points yourself. |
| Photo Submission | Runner submits a photo; same manual review as Open Text, from the Live Management page. |
No-go areas
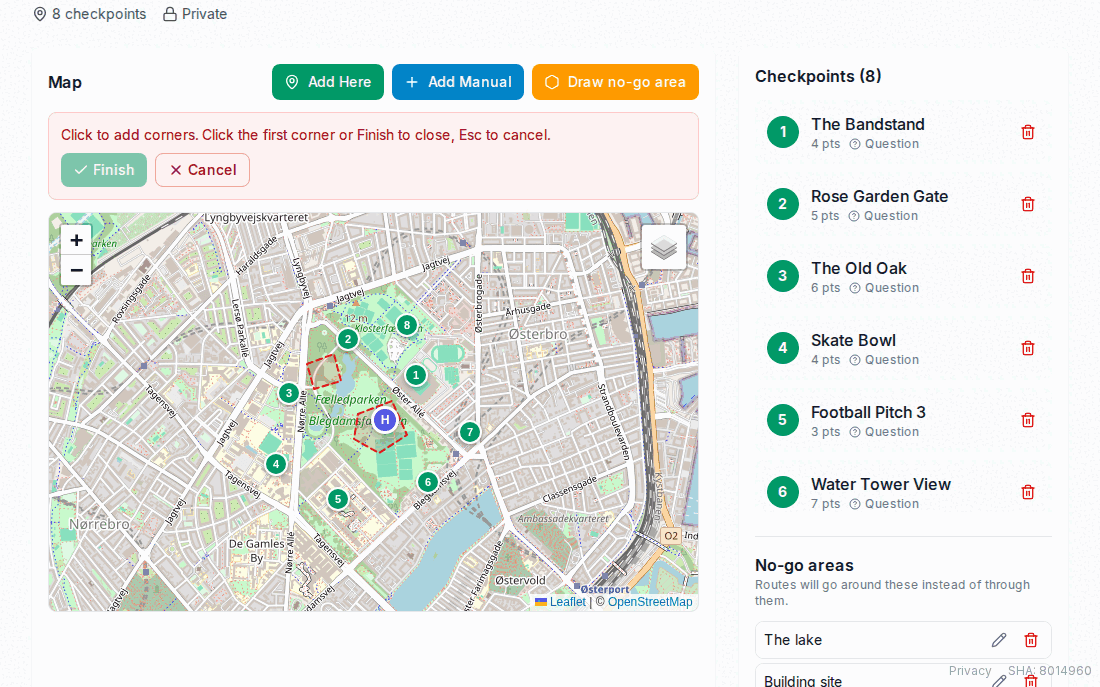
A set can also carry no-go areas: outlines the route should walk around rather than through — a lake, a motorway, a private field, a building site. Switch the map into Draw no-go area and click corners; click the first corner again or press Finish to close the shape, Esc to abandon it. An area needs at least three corners and its outline may not cross itself, and you can drag the corners of a finished one to reshape it. Route generation then prices any leg that would cross an area at the distance of going around it, so routes avoid your areas without generation ever failing — and the team route previews draw both the areas and the path each leg was priced along, so you can see the detour the numbers assumed.
Editing a set — moving checkpoints, adding a no-go area — does not touch games whose routes were already generated. Use Regenerate routes on the game’s Teams & routes page to apply the change.
Moving the home base
The home base pin is draggable too. Moving it also moves the home base of every game on that set which hasn’t started yet; running and finished games keep the position they were played on. Existing routes are left exactly as they are, since re-optimising them from the new position is a decision you may not want — do that yourself with Regenerate routes.
Sharing a set with co-managers
Every set has a share mode, set from the Share button:
| Mode | What others can do |
|---|---|
| Private | Only you. |
| Read Only | Anyone with the code can view and use it in their own games, not edit it. |
| Collaborative | Anyone with the code can edit checkpoints too. |
| Public | Listed on the public Explore page for anyone to find and use. |
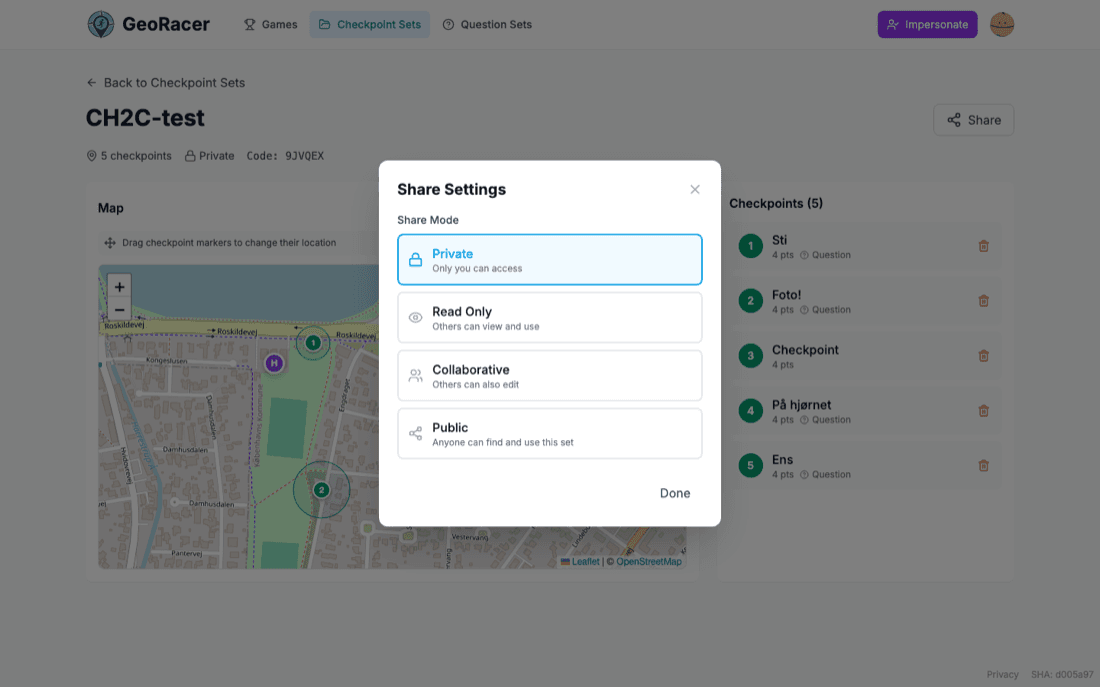
Someone joining with a share code becomes an editor automatically if the set is Collaborative, or a viewer for Read Only / Public — there’s no per-person role picker. If the owner later downgrades the share mode, editors quietly lose their edit rights.
Question Sets
Question sets are a separate, optional layer: trivia solved between checkpoints rather than at them. They’re what turn a GPS scavenger hunt into something the runner and home base have to solve together — each question has two separate clues.
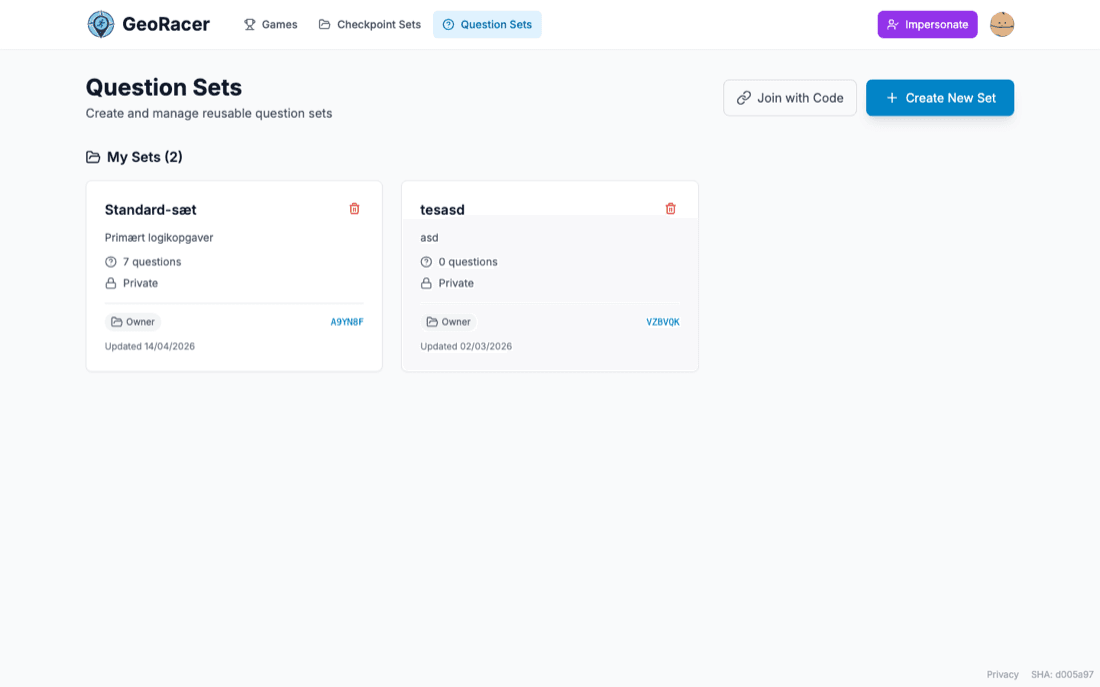
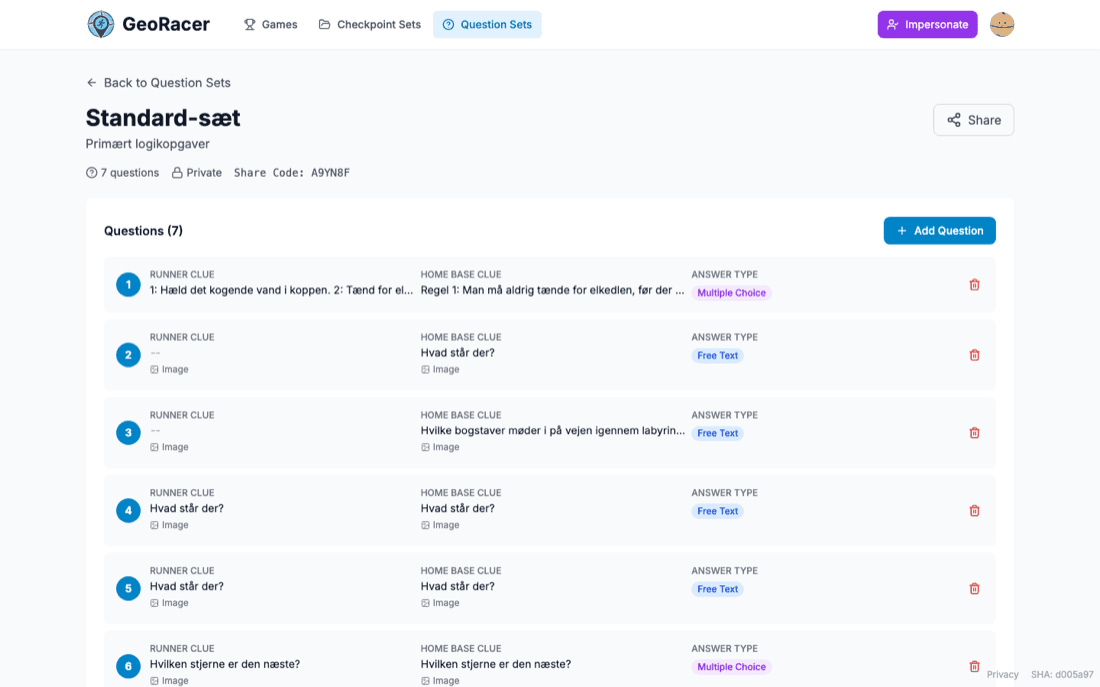
The runner clue (with optional image) goes to the phone in the field; the home base clue (also with optional image) goes to the browser back at base. Design a set so neither clue alone is enough — a photo of a sign only the runner can see, paired with a question about it that only home base is shown to relay back, for instance. Each question is either Free Text or Multiple Choice.
Questions are drag-to-reorder, and that order is not just cosmetic: a game can be set to hand its questions out in the set’s order rather than at random (§4). Both halves of a question are required — a question can’t be saved without a runner clue, a home base clue and at least one correct answer — so a half-finished question can’t quietly reach a team as an unanswerable one.
A question set only affects a game once you attach it during game setup, where you also set how many questions get drawn per leg, in what order, and how many bonus points a team earns for a perfect leg.
Creating a Game
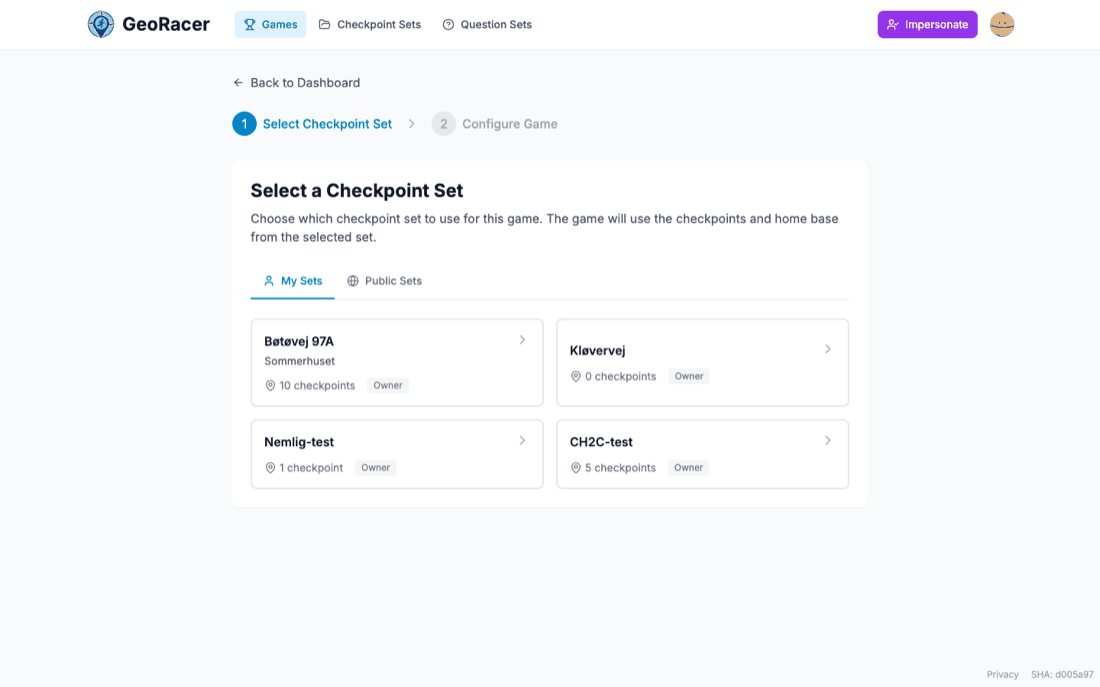
A game is a two-step wizard: pick a checkpoint set, then configure everything else. Start it from Create New Game on the dashboard.
Step 1 — Select a checkpoint set
The only two things a game truly requires are a name and a checkpoint set — pick from your own sets or anything shared publicly. The game inherits its home base location and checkpoint list from whatever set you choose here; you can’t set home base coordinates per-game.
Step 2 — Game Settings
The top card covers the basics: name, optional description, and — behind Enable game duration — an overall duration in minutes. Leaving duration off means the race runs until you end it, but it also rules out anything that needs a deadline: late-return penalties and half-time breaks both require one. Alongside it sit the display defaults: a separate, shorter trail duration (how long a runner’s breadcrumb trail stays on the map before fading), whether checkpoint radius circles are drawn, and the default map type — street or satellite — that home base and the live view open on. Players can still switch layers during the game; this only picks the starting one.
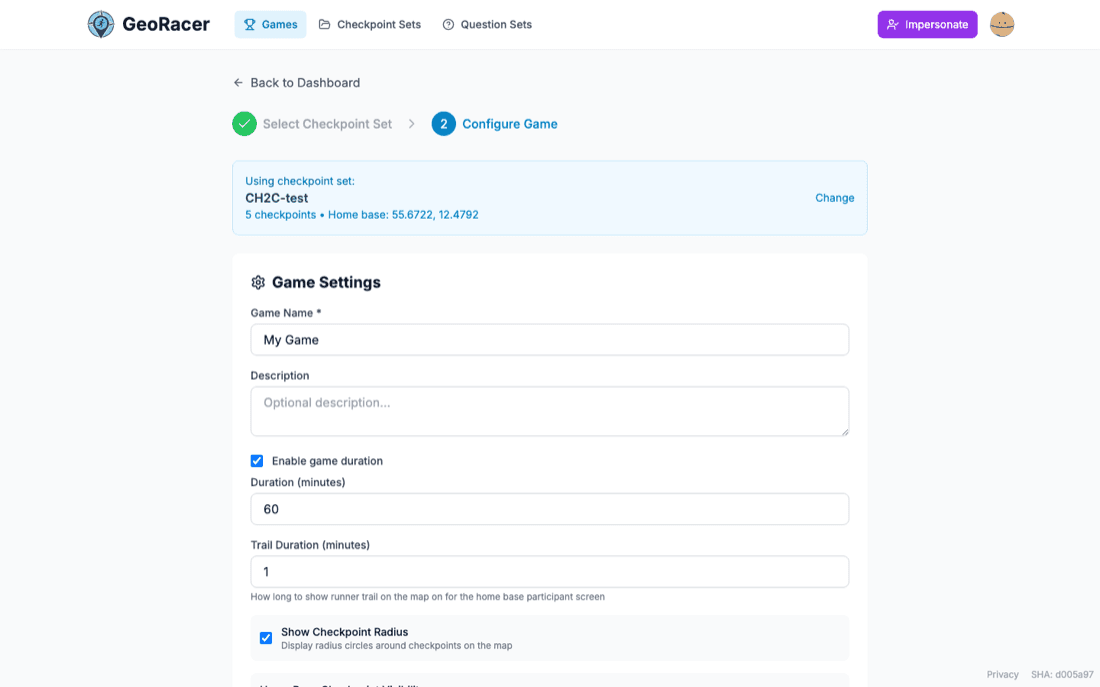
- Home Base Checkpoint Visibility — Show All Checkpoints lets the home base teammate see the whole route at once; Show Next Checkpoint Only shows just the checkpoint currently being chased, hiding the rest for a stricter need-to-know pace. Only selectable when checkpoint order is enforced.
- Allow Team Self-Signup — lets participants create their own team while joining, instead of you pre-creating every team. Whoever creates the team becomes its home base.
- Require homebase return — turns on late-return penalties and the homebase arrival radius that detects a team as home, covered in §10.
Each game also chooses what happens when a team answers an auto-verified checkpoint wrong — Retry until correct (default: keep guessing until they get it) or Complete with 0 points (the team can give up on that one checkpoint and move on for zero points instead of getting stuck). This is a game setting, not a checkpoint setting, so the same checkpoint set can be strict in one game and forgiving in another. Whatever they typed is recorded either way, so you can read it on the Live Management page and award points by hand.
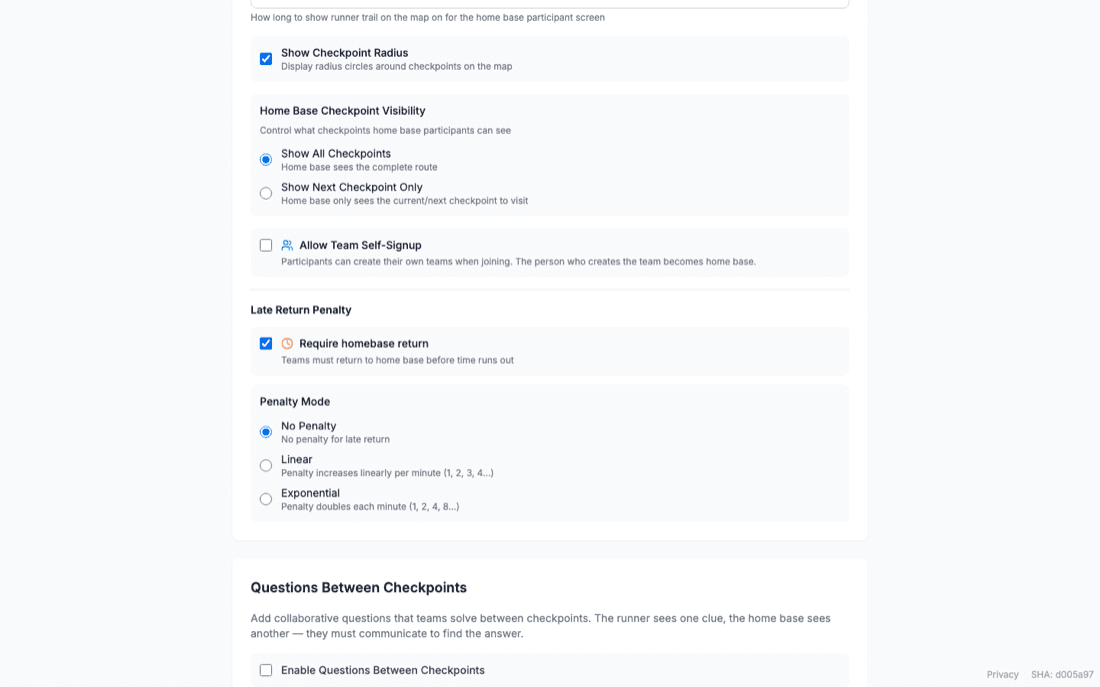
Questions Between Checkpoints
Tick Enable Questions Between Checkpoints to attach a question set. Pick one of your sets, then set Questions Per Leg (how many get handed out each leg — a leg is the stretch between two checkpoint completions), Question Order, and Bonus Points (awarded on top when a team gets every question in a leg right). Question order is either Random, where each team gets its own draw from the set, or In order, where questions follow the set’s authored sequence and every team sees the same ones — the fair choice if you plan to compare teams question by question. Either way a team never sees the same question twice.
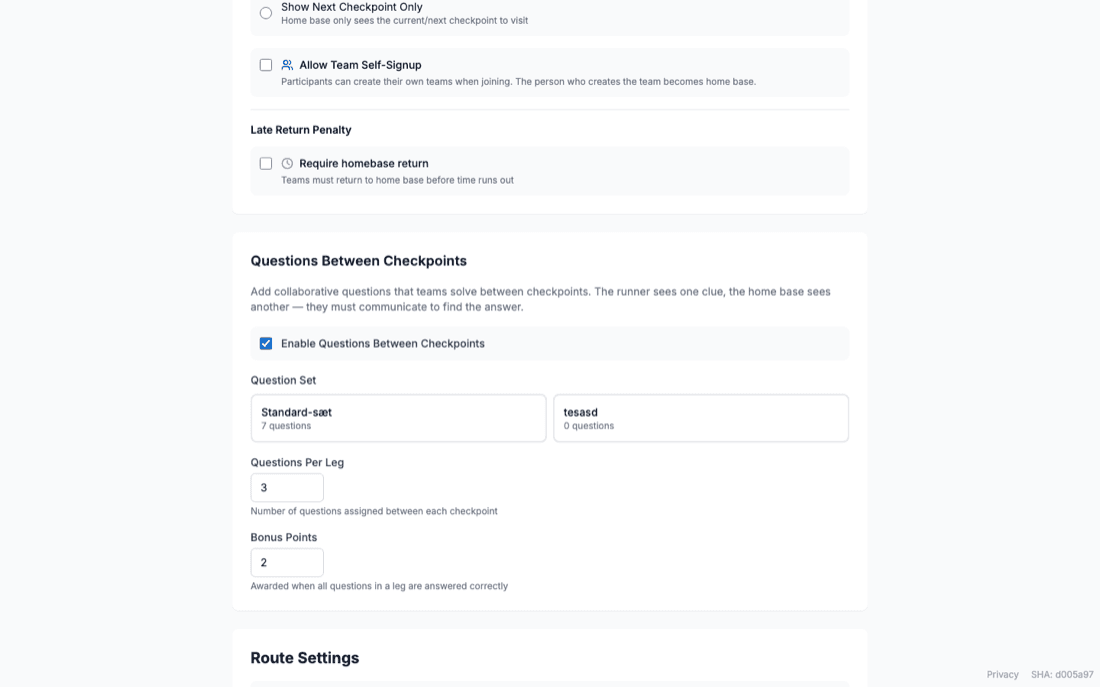
A question set can run dry: questions per leg multiplied by the number of checkpoints a team visits is how many that team needs, and the form warns you when the set holds fewer, naming the checkpoint after which teams stop getting questions. It’s a warning, not a block — a game with a short set simply goes quiet on questions for the last legs.
Route Settings
Enforce Checkpoint Order is the single switch that decides whether “route mode” means anything at all. Leave it off and every team can tag their assigned checkpoints in whatever order they physically reach them — there’s no “next” checkpoint to speak of. Turn it on, and you get to choose how that fixed order is handed out per team.
Fig. 13 — Same four checkpoints, three ways to hand them out
| Mode | What it does |
|---|---|
| Same Order | Every team gets the identical sequence, 1→2→3→4… Simplest to brief, but everyone converges on checkpoint 1 at the start. |
| Rotated Start | Same loop, but each team’s starting position is spread evenly around it — team 2 might start at checkpoint 4 instead of 1 — so teams don’t bunch up at the same spot early on. |
| Individually Optimized | Each team’s order is independently run through a shortest-route solver, so every team gets the most efficient loop for their own randomized variety — orders can genuinely differ team to team. |
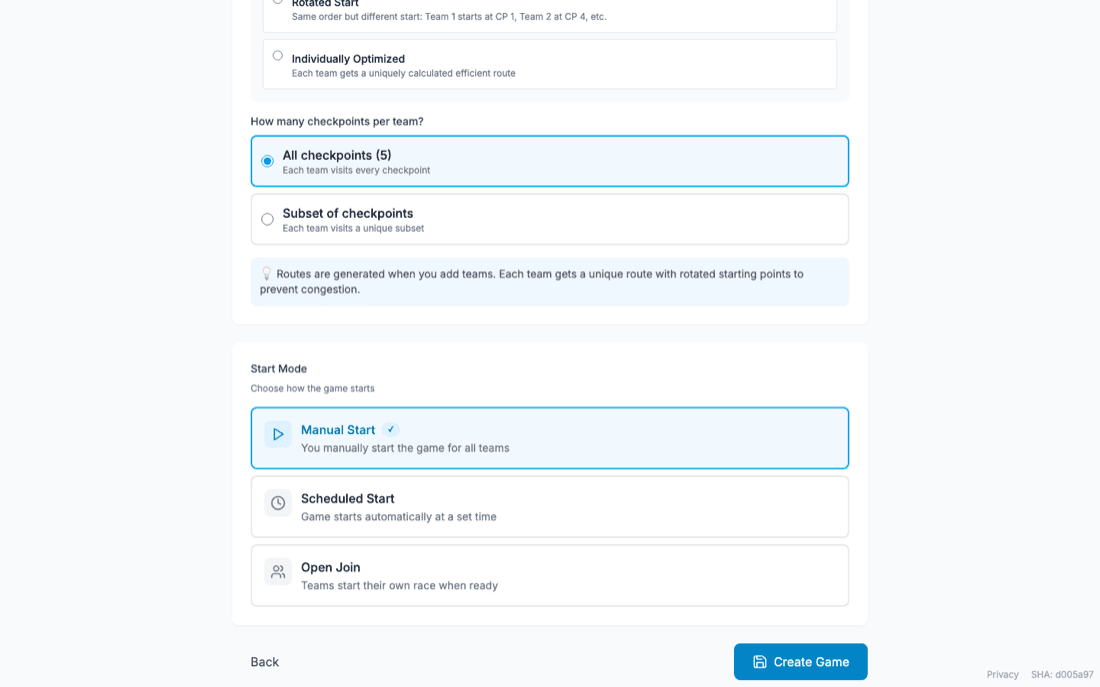
All checkpoints, or a subset?
By default every team visits every checkpoint in the set. Switch to Subset of checkpoints to instead give each team a smaller, independently-chosen slice — useful for a big checkpoint set you don’t want any one team to fully exhaust. You can cap it by a raw checkpoint count, by a target total distance in meters (the algorithm swaps checkpoints between teams’ routes until every team’s distance lands within your tolerance percentage), or both. The distance target only applies to Individually Optimized: Same Order and Rotated Start follow the checkpoint set’s own order, so there is nothing for the balancer to swap, and the form says so rather than quietly ignoring the number.
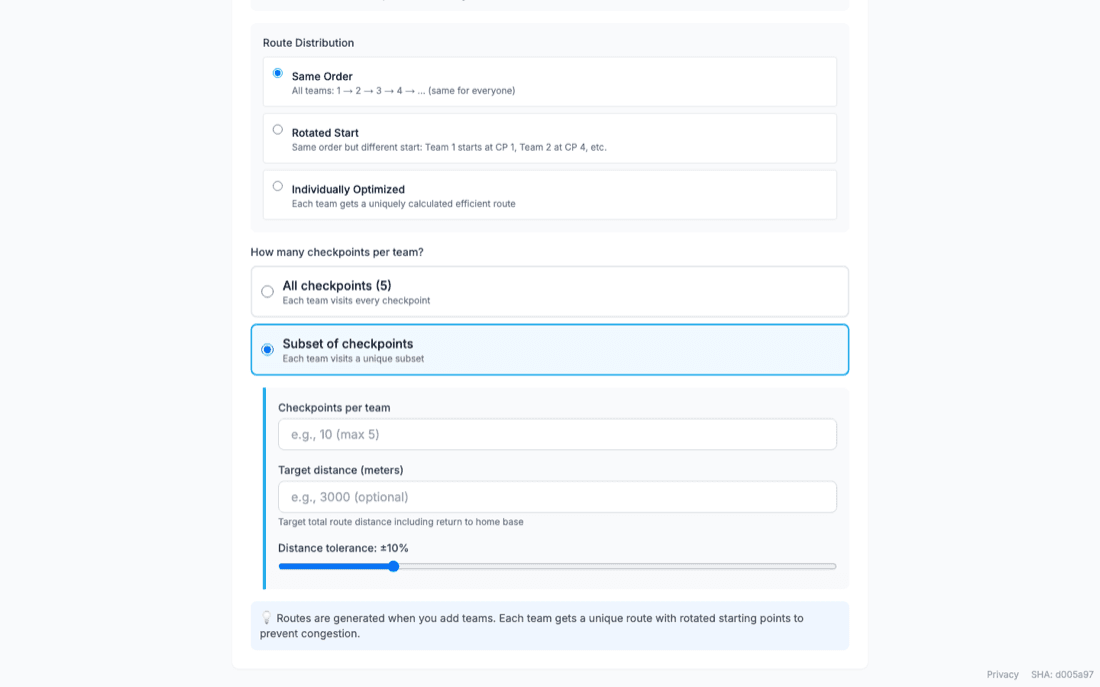
If the checkpoint set carries no-go areas (§2), every route generated for this game walks around them: a leg that would cross an area is priced at the length of the detour, so the optimiser routes around it on its own. Distances shown for a route are those detour distances, not straight lines.
Route distribution, checkpoints-per-team, the question set, and start mode all become read-only the moment a game leaves Setup. Get the shape of the race right before you hit Start — after that, a settings change means copying the game and starting over, not editing it live.
Routes regenerate automatically whenever you add or remove a team, using whatever route settings the game currently has. You can also trigger a fresh generation manually, and while a game is still in Setup you can drag-reorder any one team’s stops individually from the Teams & routes page — that reordering locks the instant the game goes active.
Start Modes
Start mode decides whose clock starts when.
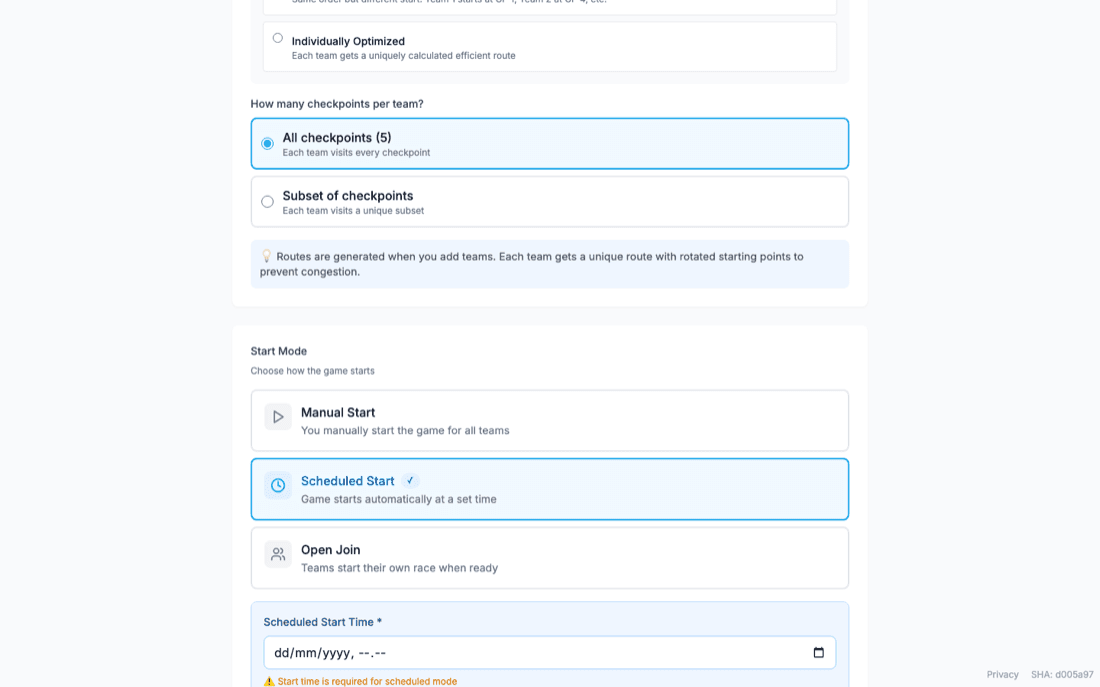
| Mode | How the clock starts |
|---|---|
| Manual Start | You press Start Game on the game detail page; every team’s timer begins at the same instant. |
| Scheduled Start | Same shared clock as Manual, but it fires automatically at a date/time you set instead of waiting for a click. |
| Open Join | You still enable the game overall, but each team starts its own independent timer whenever they’re ready, from their own device — no shared start instant at all. |
Open Join games skip the bulk “assign leg-1 questions to every team” step that a Manual start runs, since there’s no single moment when every team starts — each team gets its first questions when it starts its own race instead. Open Join also can’t use half-time breaks (§7), which need every team on the same clock.
A Scheduled start uses the same safe start operation as pressing Start Game: it validates every team route, deals the first leg of questions, and starts the clock together. Route generation itself still runs in the web app, so generate routes beforehand from the Teams & routes page. If any team has no route at the scheduled time, the game stays in Setup and the scheduler records the failure and retries instead of starting an incomplete race.
Half-Time Breaks
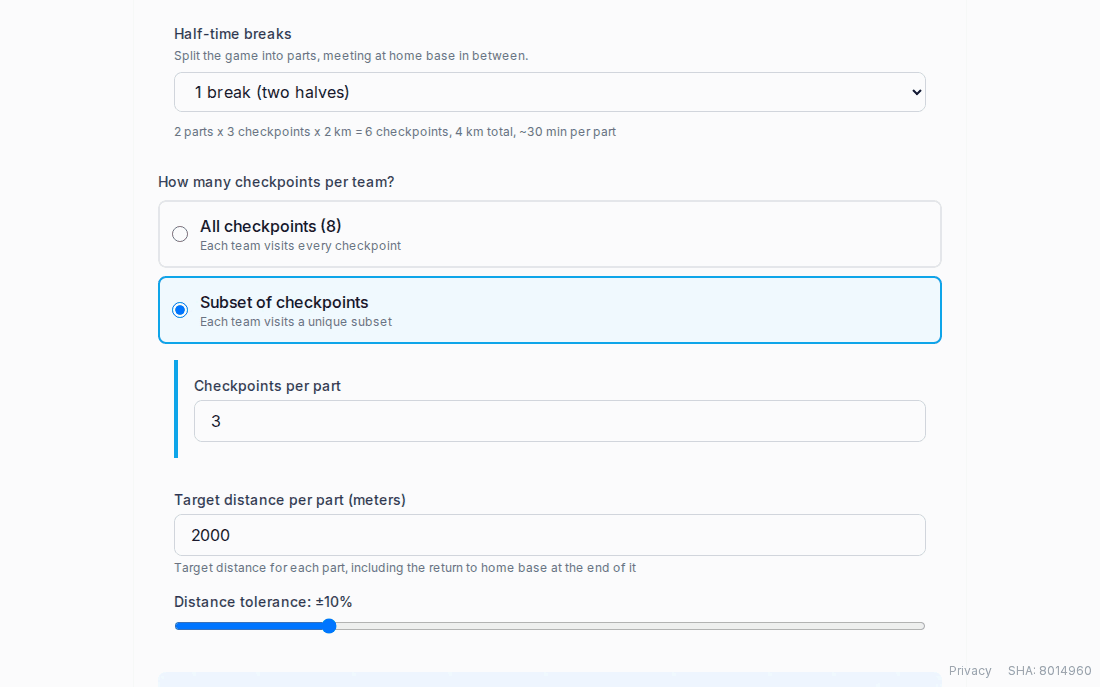
A long race can be cut into parts that meet back at home base in between — a half-time. Set Half-time breaks in the Route Settings card: one break makes two halves, and up to four breaks are allowed, so at most five parts. The setting needs a game duration and a shared start, so it isn’t available on Open Join games, and the selector tells you which of the two is missing.
Breaks change three things at once. The duration splits evenly across the parts, so two halves of a 90-minute game are 45 minutes each. The route splits too: each part is generated as its own loop out from home base and back, and checkpoints-per-team and target distance are read per part rather than for the whole race — the form relabels those fields and shows you the totals it adds up to, including roughly how long each part will take. And every break instant becomes a deadline: a team not at home base when its part runs out is late, and is charged whatever late penalty the game is set to (§10) — nothing, if you left the penalty at None.
What happens at half-time
When a part’s clock runs out the game enters half-time on its own, and everyone sees it: runners are told to head home, checkpoints and questions are closed until play resumes, and your manage screen shows how many teams are home. Teams are detected as arrived by GPS inside the homebase radius, and you can Mark as arrived any team whose phone let them down. Nothing restarts until you press End half-time — that is the one action that closes a break. It settles every team that never made the huddle, scores and re-deals the question leg, and starts the next part’s clock from that moment.
Because a break lasts exactly as long as you let it, a game with breaks ends later than start plus duration — every minute of huddle pushes the finish out. Teams still get their full playing time; you just can’t promise an exact finishing hour in advance.
Teams & Roles
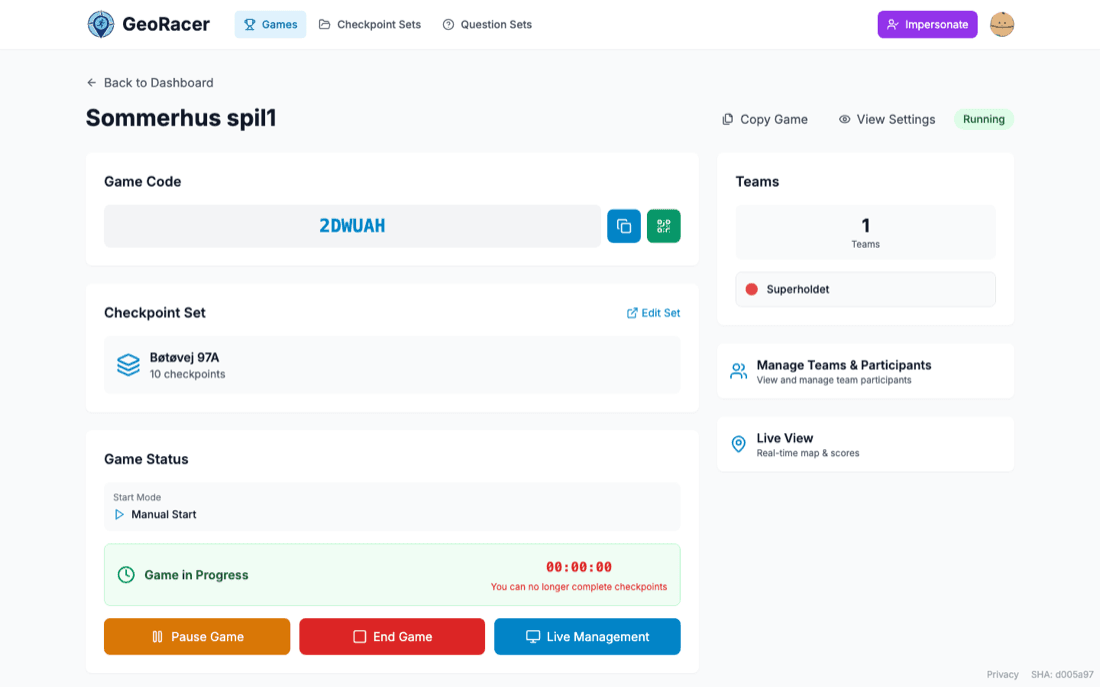
Teams live on one screen: Teams & routes, reached from the summary card on the game detail page (the card itself only counts teams and how many have routes). Everything happens there — adding, renaming, recolouring and deleting teams, the live route map beside them, each team’s stop order, and who has joined. Adding or removing a team automatically regenerates routes for everyone in the game, so it’s safe to keep adjusting the roster right up until start — team creation itself is blocked once the game goes active.
Adding teams one at a time, or ten at once
Add team takes a name and a colour. Add several takes a number instead and creates that many in one request, naming them in sequence from where your roster left off and picking distinct colours automatically — the form shows you the first and last name it is about to create before you commit. Rename anything you don’t like afterwards; the point is not to type twelve colour pickers by hand.
Route coverage
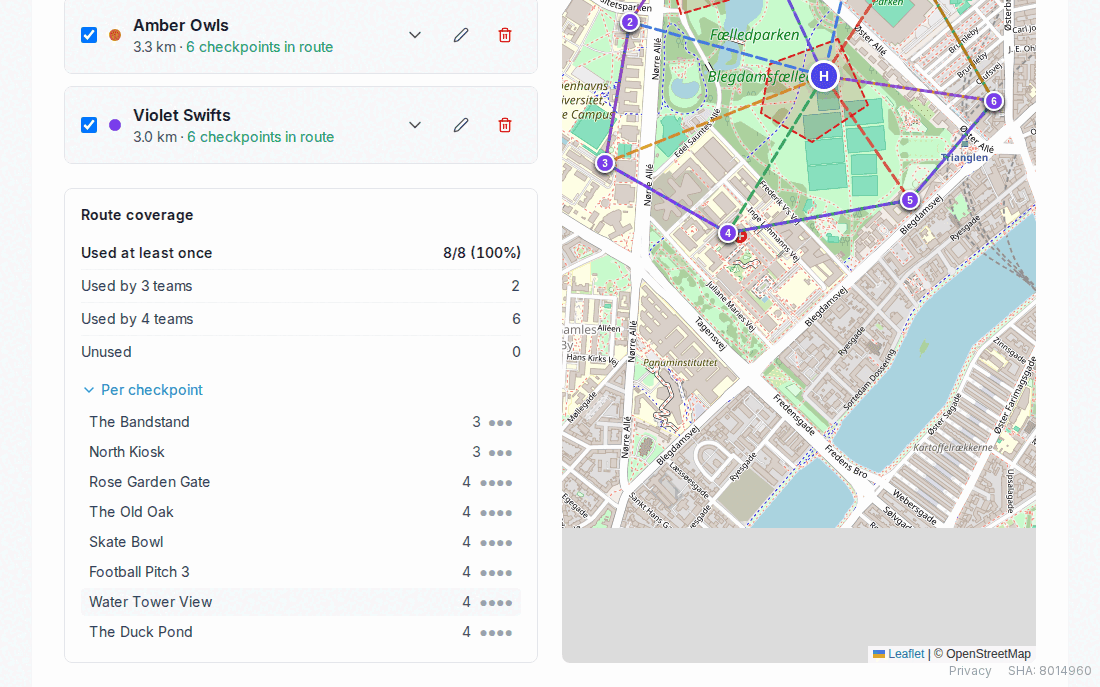
With routes generated, the page also reports route coverage: how many of the set’s checkpoints are used by at least one team, how many teams use each one, and which are used by nobody. Unused checkpoints are drawn on the route map too, in a way that distinguishes them from the ones in play, and clicking a checkpoint in the coverage list focuses the map on it. It is the fastest way to notice that half your carefully placed checkpoints are sitting idle because the subset size is too small.
Joining with the game code
Every game gets a 6-character code plus a QR code you can print or project. Participants scan the QR code, or open the /join page and enter the code, then pick a role for the team they’re joining:
- Runner — the person on the course with the phone. Running is done in the GeoRacer app, not a browser.
- Home base — the coordinator on a browser, off the course.
Each role is a single exclusive slot per team. If someone tries to join a role that’s already taken, they’re told it’s occupied unless they explicitly force-join — which silently takes over the slot from whoever was in it, rather than kicking them through a separate action.
Runner invites
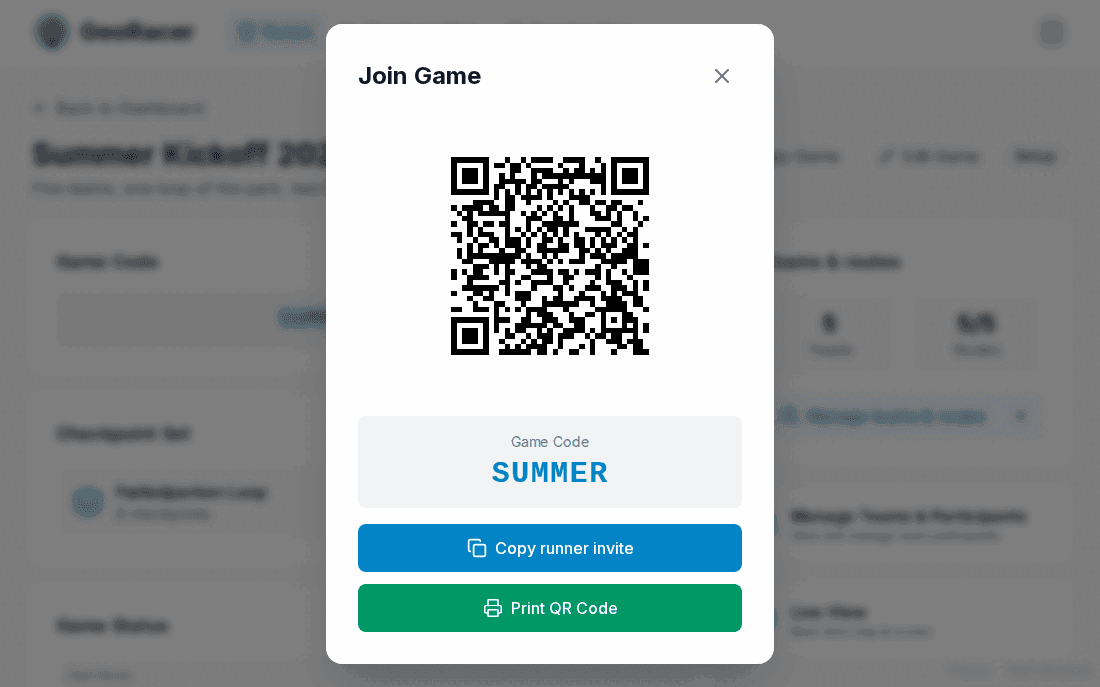
The QR button on the game detail page opens a join dialog holding three things: the QR code itself, a Print QR code button for the sheet you tape to the wall, and Copy runner invite — a link that opens the game straight in the runner’s app on their phone, and lands on a page offering the app if they don’t have it yet. Send that link to your runners rather than the bare code; it saves explaining where the app is. The QR code itself still points at the ordinary join page, which is the right destination for a home base operator on a laptop.
Who has joined
Open a team’s details to see its participants, their role, and when they joined. You can remove one from here — they can rejoin with the game code, so this is for cleaning up an abandoned slot or a wrong-team join, not for locking someone out.
Routes per team
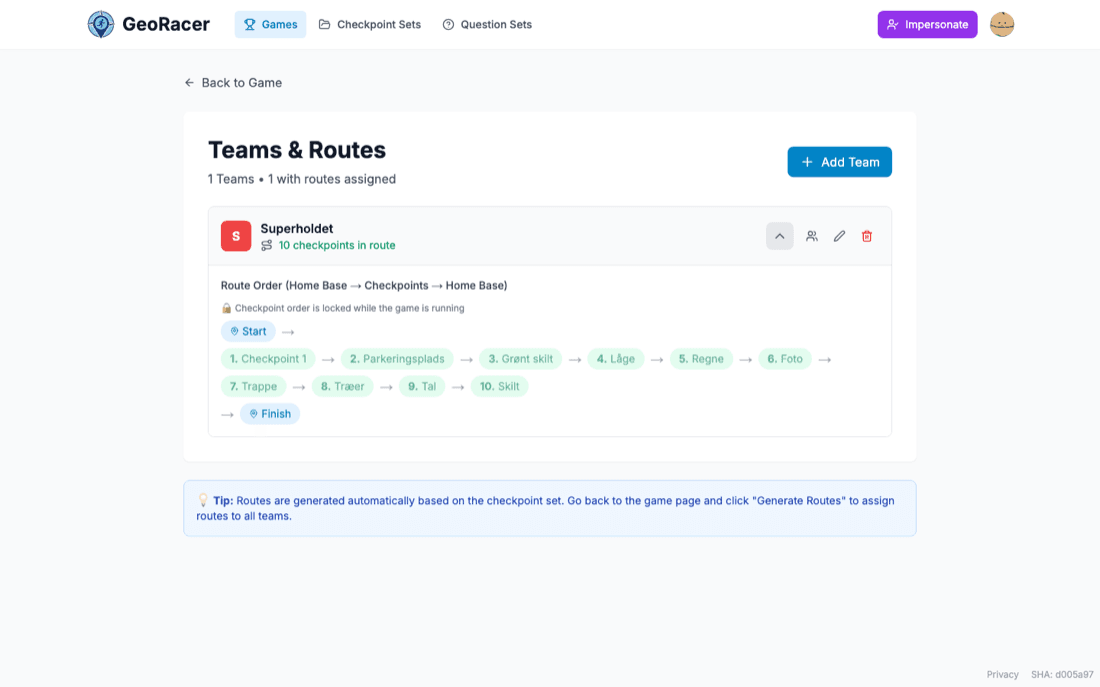
Expand a team to see its full stop-by-stop order, home base to home base, and to show that route on the map beside it. While the game hasn’t started yet, this is drag-to-reorder; once it’s running, it’s locked. A game with half-time breaks (§7) shows the route in parts, each headed with its own distance and separated by the half-time at home base.
Running the Race
Once a game is active, two pages do the day-to-day work: Live View for watching the map and leaderboard, and Live Management for touching individual teams — verifying answers, messaging, and manual overrides.
Live View
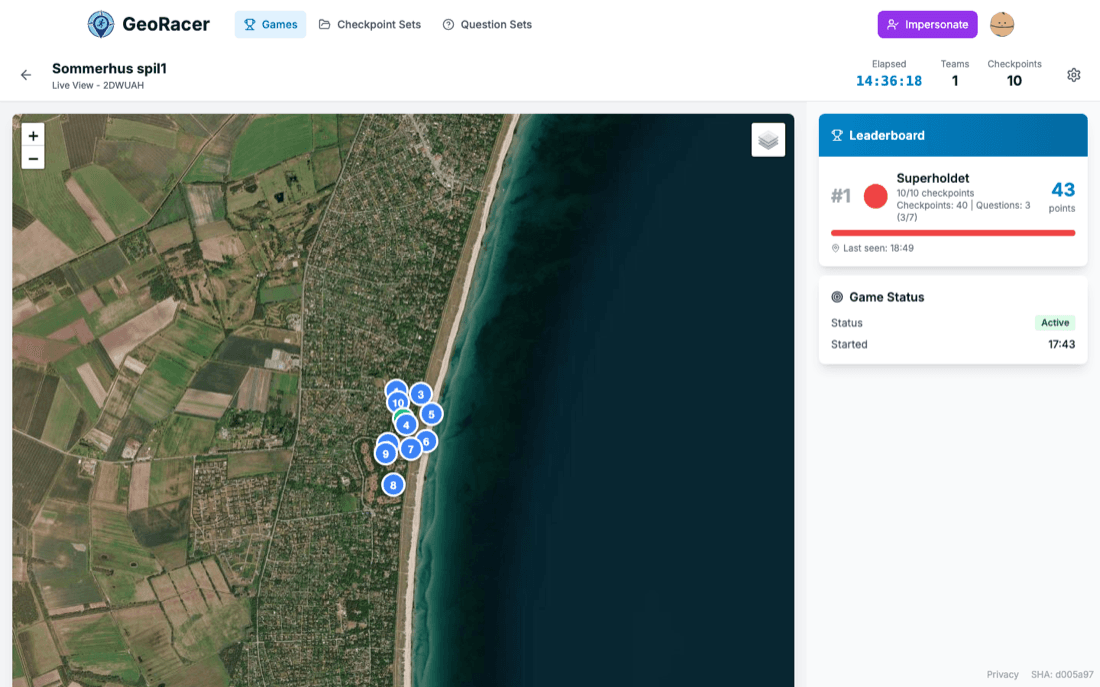
A real-time map with each team’s current position, a fading movement trail, and a leaderboard sorted by final score (checkpoint points + question points − late penalty). Everything updates live — no refresh needed. Follow teams, off by default, keeps the map framed on everyone who has a position, re-fitting only when somebody runs off the edge rather than on every update; pan or zoom yourself and following switches off, so the board never fights you for the map. Each team’s progress is measured against its own route, so “4 of 9” means four of that team’s nine stops, not four of the set.
Live Management
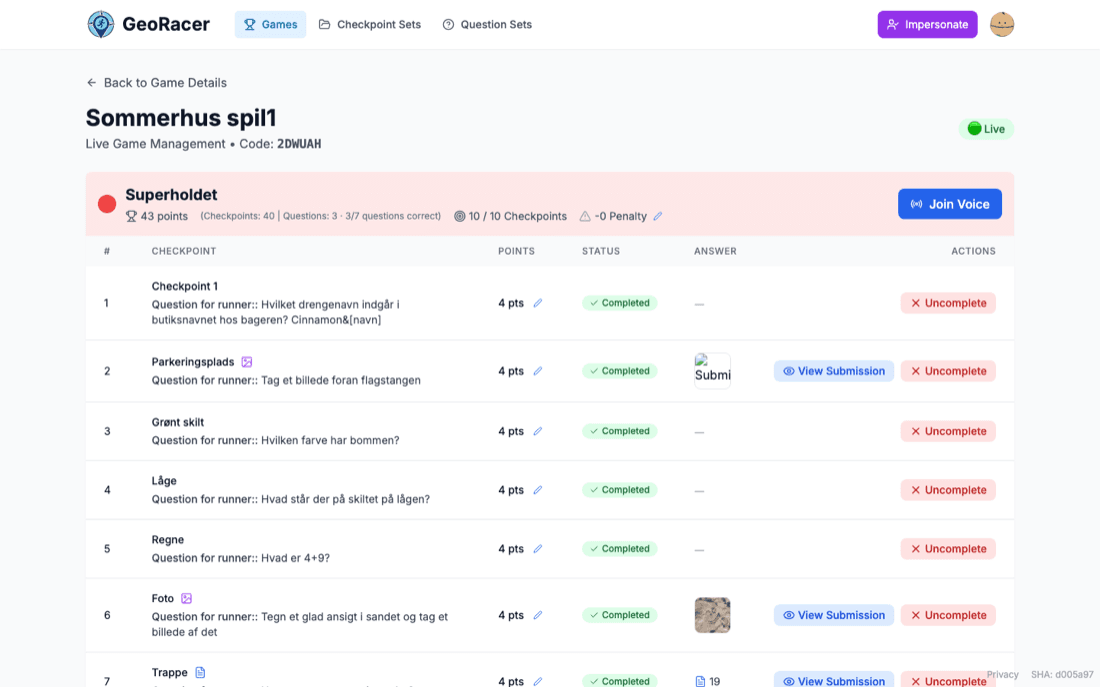
Per team, this page shows every checkpoint’s status, lets you edit the late penalty and awarded points inline, and gives you a Join Voice button to drop into that team’s voice channel directly from the dashboard. It is also where you settle a team’s return: Mark as returned records a team as home without waiting for GPS, and during a half-time (§7) the same screen shows how many teams are home with a Mark as arrived per team and the End half-time button that restarts the race.
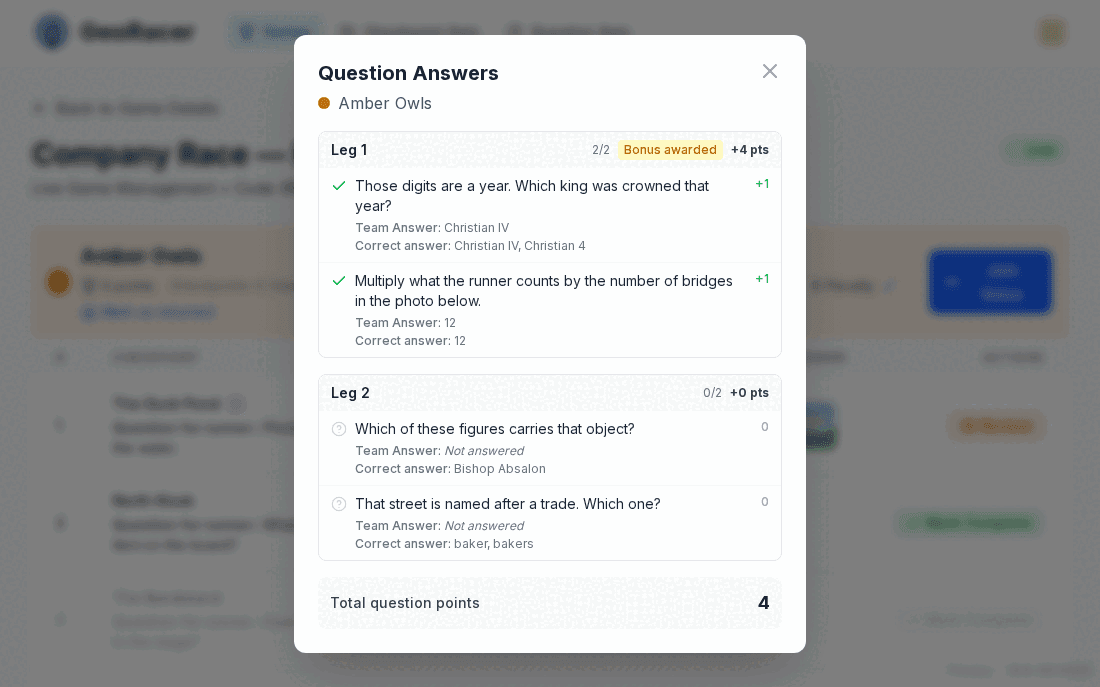
Reading a team’s question answers
Question answers opens a team’s trivia record leg by leg: each question, what home base submitted, whether it counted, the points it earned, and whether the all-correct bonus was awarded for that leg — with a total at the bottom. Two outcomes look similar on a scoreboard but are recorded separately here: a question answered wrong and one never answered, which is what a team leaves behind when it reaches the next checkpoint before submitting.
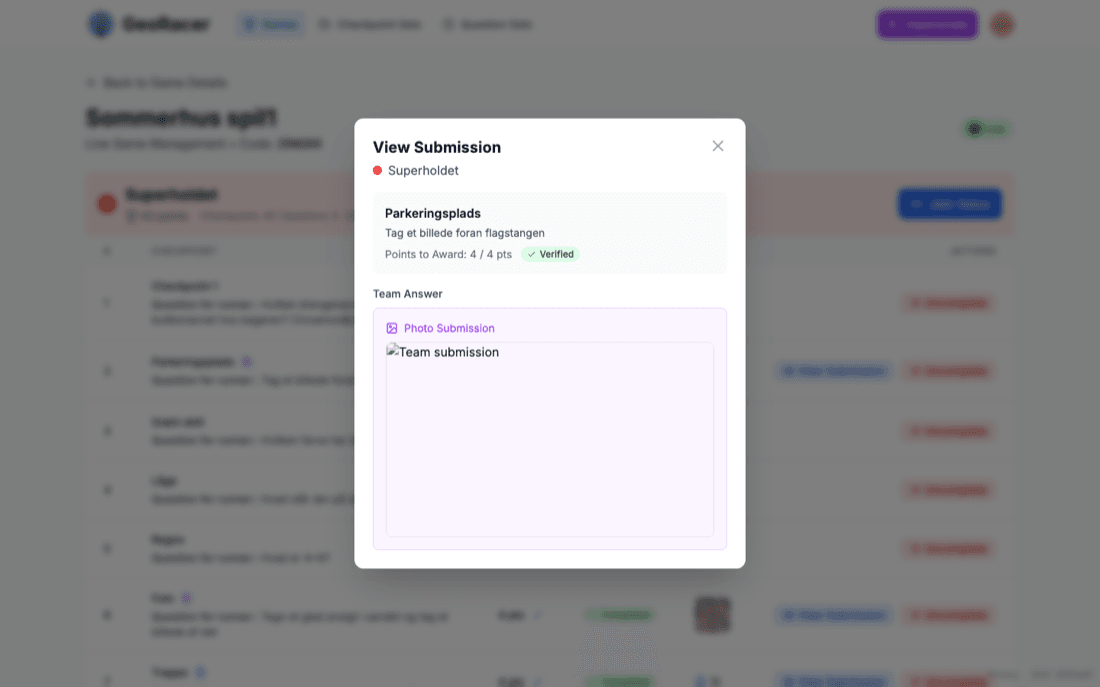
Reviewing Open Text and Photo answers
Anything submitted to an Open Text or Photo Submission checkpoint sits at “Pending Verification” — worth zero points — until you open it and decide. You can award any point value up to the checkpoint’s maximum (not just all-or-nothing) and leave a note, which gets sent to the team as an in-game message if you write one.
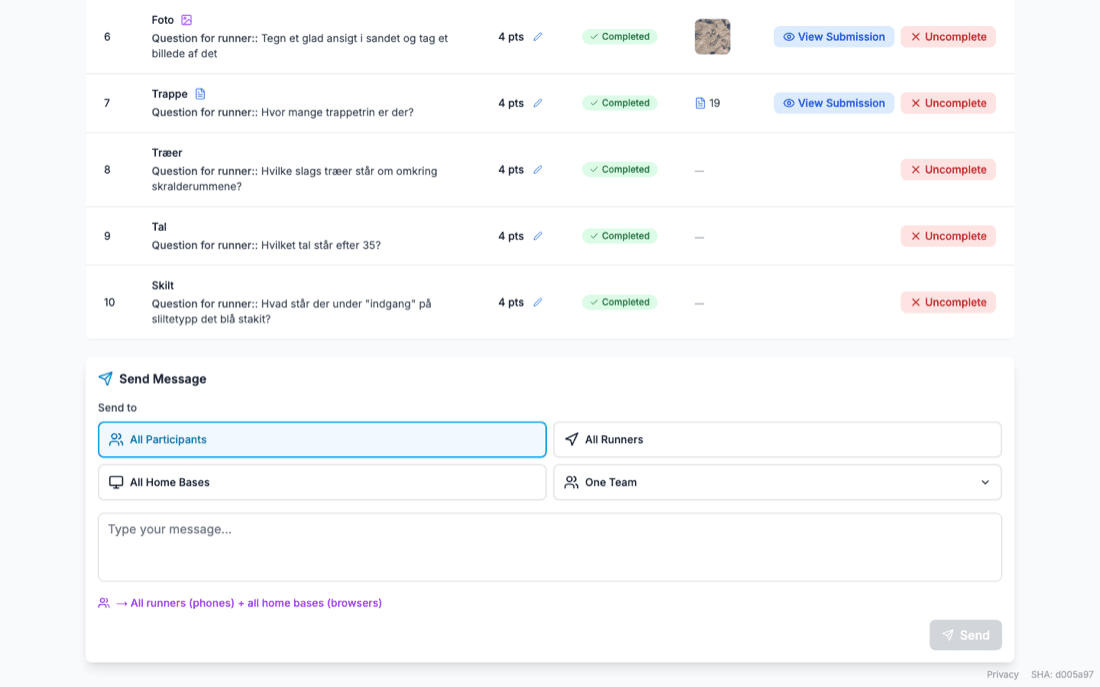
Every checkpoint also has an Uncomplete action, and a manager can toggle a checkpoint complete on a team’s behalf entirely — bypassing GPS and order checks. Use it to fix a runner’s dead-phone moment or a genuine dispute, not as a routine shortcut.
Messaging teams mid-race
Send a text message from the bottom of Live Management, targeted as broadly or narrowly as you like: all participants, all runners only, all home bases only, or one specific team (with the same runner/home-base narrowing available within that team).
Scoring & Penalties
Fig. 27 — How a final score is built
Checkpoint points
Each checkpoint’s point value is fixed when you create it. Auto-verified checkpoints score in full the instant the answer matches; Open Text and Photo checkpoints score whatever you award during review.
Question points
1 point per correct answer, drawn from whichever question set is attached, plus the leg’s bonus points if a team answers every question in that leg correctly. Leg 1’s questions are handed out the moment the game starts — in an Open Join game, the moment that team starts its own race — and each subsequent leg’s questions are assigned right after the checkpoint that ends the previous leg is completed. A question the team never answered is dismissed at zero when the next checkpoint lands, rather than carried into the next leg: the trade between running and answering is the point, so a question left behind is a question lost. No new leg is dealt after the final checkpoint, and half-time scores and re-deals the current leg the same way a checkpoint does.
Late return penalty
Turned on with Require homebase return, which also needs the game to have a duration — without a deadline there is nothing to be late for. A team is detected as home by GPS once it comes within the homebase arrival radius after its deadline has passed, and you can settle one by hand with Mark as returned. Pick a mode:
| Mode | Formula (base = 1) |
|---|---|
| No Penalty | 0, regardless of lateness. |
| Fixed | base, regardless of lateness — 1, 1, 1, 1… A team one minute late and a team half an hour late pay the same. |
| Linear | base × minutes late — 1, 2, 3, 4… |
| Exponential | base × 2^(minutes late − 1) — 1, 2, 4, 8, 16… doubling every minute. |
The penalty is capped so it can never push a team’s final score below zero, and you can always override a team’s penalty value by hand from Live Management — useful for a dispute or a GPS hiccup you don’t want to punish. In a game with half-time breaks (§7) the same mode is charged at every break deadline, and those charges stack: a team late to both huddles and late home again pays three times, on one running total.
Ending a Game
Fig. 28 — Game state machine
There’s no automatic finish. Once a team’s game duration runs out, they simply can’t complete further checkpoints — but the game itself stays active until you press End Game, behind a confirmation dialog, from either Active or Paused. In a game with half-time breaks, that deadline is not start plus duration: every minute of half-time pushes the finish out by a minute, and the game ends a full final part after you released the last break. Ending a game mid-half-time is allowed and settles the open break on the way out, so nobody is left with an unresolved arrival.
Ending a game doesn’t recalculate anything — scores just stop moving because no further checkpoint completions are possible. You can still adjust a team’s late penalty or individual checkpoint points, and still review pending Open Text / Photo submissions, after the game is finished. Once finished, the Live Management link relabels to Review Answers, and the Live View becomes a static results page — final leaderboard, medal emoji for the top teams, every team’s trail shown at once instead of live tracking.
Use Pause Game for a genuine mid-race interruption (weather, an injury, a break for lunch) — it freezes the clock and keeps the original start time intact, so resuming doesn’t re-run any of the start-of-game setup. Use Copy Game (from the game detail page) rather than editing a finished game, if you want to re-run the same route with the same settings another day.
Debriefing a Race
A race that ends at the leaderboard is a good afternoon out. The reason GeoRacer also works as a team exercise — for a workplace, a course, a club — is the half hour after it. The game is built so a runner and a home base cannot see the same information, and almost every coordination habit a group has shows up in how they handle that. This section is for the manager who wants that conversation and not just a winner.
Tune the race to the conversation you want
Most of the settings in §4–7 double as facilitation knobs. Decide what you want to talk about afterwards, then set the game up so it happens:
| What you want to surface | Set it up like this |
|---|---|
| Dependency and communication load | Home base visibility on “Show Next Checkpoint Only”, so neither side ever holds the whole picture and both have to narrate what they see. |
| Prioritising under time pressure | More questions per leg than a team can comfortably answer, forcing a choice between running and thinking — and a question left unanswered when the next checkpoint is reached is worth zero, not carried over. |
| Deadline discipline | A required homebase return with the exponential penalty, so “can we fit one more checkpoint?” is a real gamble rather than a rounding error. |
| The cost of being wrong | Run one game on “Retry until correct” and one on “Complete with 0 points”. Teams guess freely under the first and go quiet under the second — a difference worth naming out loud afterwards. |
| Regrouping, and a mid-race reset | One half-time break, which forces the whole field back to home base and gives every team a natural moment to change its approach — and you a chance to watch which ones use it. |
| Results that can be compared | Rotated Start: the same loop with a staggered start, so teams can’t shadow each other and the finishing order actually means something. |
| Levity, and material for the wrap-up | Photo Submission checkpoints, which let the creative and the silly score points and give you something to put on a screen while you talk. |
What a race reliably exposes
Across very different groups the same handful of patterns turn up. You don’t have to engineer them — just watch for them and bring them up afterwards:
- Conclusions instead of context. The runner asks “which way?”, home base says “left”, and nobody notices they were picturing different streets. Teams that describe what they can actually see — “red brick wall, gate on my right” — desync far less. It’s the same failure as a thin handover or a one-line bug report.
- Implicit decision rights. Nobody is appointed leader, yet within twenty minutes every team has settled who calls a skip, who owns the map, and who talks. Sometimes two people are deciding and a third has quietly stopped contributing.
- Backseat driving vs. intent. Home base has the map and is tempted to give turn-by-turn instructions. Teams that hand over intent instead — “get to the church square, then call me” — move faster and spend less of the voice channel on corners.
- Abandoned work. Questions drawn for a leg and never attempted are the clearest signal in the data: work picked up, carried, and dropped when the clock moved on.
- Optimism about time. Nearly every team believes it can fit one more checkpoint into the last fifteen minutes. The late penalty puts a price on that belief.
- Silence under stress. Voice channels go quiet exactly when a team is lost or behind — the moment they most need to be talking. Where the radio went quiet is usually the most interesting minute of the race.
The evidence you have afterwards
A finished game is a record, not just a score, which is what keeps the conversation off vibes and onto what happened. Between the results view and Review Answers you have: every team’s full trail, shown all at once instead of fading, so backtracking and dead ends are visible from across the room; the message log; each leg’s questions, where answered wrong and never answered are recorded separately; checkpoint completion times, which show you the one leg that cost a team its race; and the late penalty each team paid.
Use Join Voice from Live Management during the race and listen to two teams for five minutes each. You are not there to help — you are collecting the two or three exact quotes that will make the debrief land.
Questions that open people up
- What did you assume the other one could see?
- What did you know and never say out loud?
- When did you first suspect you were wrong — and what delayed you saying it?
- Who decided to skip that checkpoint? Was that agreed, or did it just happen?
- Where did the radio go quiet, and what was going on then?
- Which questions did you never even open, and how did that get decided?
A format that fits in half an hour
Ten minutes per team on their own, with their trail and their answers in front of them and the questions above to work through. Twenty minutes together, one team at a time, walking their trail on the map. Then each team names one thing they would do differently — one, not a list — and if this is a workplace group, one of those things they will actually try next week. Follow it up a month later; that is the part that decides whether the afternoon changed anything.
If you are running this at work
Don’t pitch it as team building. Pitch it as a cheap experiment on a problem the group already complains about: “we keep saying handovers between us lose information — here is ninety minutes where exactly that happens ten times, harmlessly, and we get to watch ourselves do it.” That framing wins the sceptics over, because it asks people to compete at a real task rather than to be vulnerable. The four objections you will get, and the honest answers: forced fun — there is a goal, a clock and a scoreboard, and no sharing circle; not everyone can run around — half the roles sit indoors with a laptop and are arguably the harder job, and route length is yours to set; we don’t have a day — sixty to ninety minutes of play plus half an hour of talking; budget — their own phones, OpenStreetMap, and the streets around the office.
The moment the leaderboard reads as a verdict on people rather than on how a team coordinated, the debrief stops being honest. Keep the prize deliberately silly, and think twice before putting a manager and their own reports on opposing teams in a race whose results you plan to discuss in public.
FAQ
Can I change the route mode or start mode after the game has started?
No — route distribution, checkpoints-per-team, question set, break count, and start mode all lock the moment a game leaves Setup. Use Copy Game to spin up a fresh game with different settings instead; a copy brings the question settings and the team routes with it.
Why did my scheduled game stay in Setup?
Every team needs a generated route before a scheduled game can start. Generate routes from Teams & routes; the scheduler retries safely and deals the first question leg when the game starts. See the warning in §6.
Do I have to use half-time breaks?
No, and they’re off by default. They need a game duration and a shared start, so an Open Join game can’t have them at all. Everything else about a race is unchanged with zero breaks.
A no-go area sits right across the only sensible path — will route generation fail?
No. A leg that crosses an area is priced at the cost of going around it, so the optimiser avoids areas by preferring cheaper legs; it never refuses to produce a route. If an area makes a checkpoint genuinely unreachable on foot, that’s your judgement to make, not something the app will block.
What happens if I add a team mid-setup after already tweaking another team’s route order?
Adding or removing any team regenerates routes for every team in the game, based on the current route settings — so a manual drag-reorder you made earlier will be overwritten. Finalize your roster before hand-tuning individual routes.
A runner and a home base both try to join the same team — what happens?
Each role (runner, home base) is a single slot. A second join to an already-filled role is rejected unless it explicitly force-joins, which silently replaces whoever was there — there’s no separate “kick” button in the dashboard for this.
Do I have to use Question Sets?
No — they’re entirely optional, off by default. A game without one is a pure checkpoint hunt; turning it on just layers extra between-checkpoint trivia on top.
Can I award partial credit on an Open Text or Photo submission?
Yes — the review modal lets you set any point value up to the checkpoint’s maximum, not just approve-for-full or reject-for-zero.
What if a team’s timer runs out while they’re still mid-route?
They simply can’t complete any further checkpoints once time is up — the game keeps running for everyone else. Ending the game is always a manual, explicit action.
Does “Show Next Checkpoint Only” work if I haven’t enforced checkpoint order?
No — it’s disabled without a defined “next” checkpoint to show, and switching order enforcement off automatically resets home base visibility back to “all” if it was set to next-only.
Can I manually mark a checkpoint complete for a team?
Yes, from Live Management — it bypasses GPS proximity and order checks entirely. Meant for fixing a dead phone or a genuine dispute, not routine play.
Screenshots and behavior shown here are captured from the live GeoRacer dashboard.